Showing posts with label new in it. Show all posts

Monday, January 16, 2012

Google Tips: Improving Your Search Skills

By: Muhammad Iqbal Akhtar


All of us are accustomed to using Google on daily basis, either directly or indirectly.

If I ask you what's the number of cancer patients in Pakistan? Almost all of you readers will jump onto Google or any search engine and query for the answer. Google is good at understanding natural questions like what is this, what is that but Google is also able to understand certain other statements which can help you make your search less time consuming & relevant, here are a few.


Get the World Time:

You want to call someone who lives in let's say Canada but you don't know the time there. Here's the simplest solution, just Google time Canada. A screen shot of the result:


Currency Converter :

Want the currency exchange rates or the exchange value? Just Google Currency A in Currency B.


Local weather?

No problem.

If your city result doesn't come up directly, use this term weather channel 'City Name' and open the first link of weather.com their reports are quite elaborate and neat.


Get Definitions

Want the definition of potpourri but don't want to read the Wikipedia article or lengthy explanations? Use this keyword, 'define: Desired Word'


A little calculation?


Search From a Particular Website:So you want to search for MMS Rates on Warid’s website but the search at Waridtel.com didn't get you your desired results or you are on a website that has no search facility. Here's how Google can help, write your search term than the keyword site: followed by desired website.


  • More search features are here on Google’s website: http://www.google.com.pk/intl/en/help/features.html
  • And yes you can always check Google Labs for any other of their upcoming projects and to-be-added new features, link: http://www.googlelabs.com/
  • Check this Google Labs India project that helps you in finding Hindi Music: http://www.google.co.in/music

By: Muhammad Iqbal Akhtar


Friday, September 30, 2011

Windows 1.0 to 8

1985  Windows 1.0


The First Version of Microsoft Windows, Windows 1.0, with simple applications and the concept of multitasking on PC.

1987  Windows 2.0 


The Second Version of Windows, Windows 2.0 with some fixes and the Control Panel. 

1988  Windows 2.1 


The Second Version of Windows with some additions, and some fixes, Windows 2.1, the Paint software is seen in this one! 

1990  Windows 3.0 


The Third Version of Windows, Windows 3.0, featuring the File Manager and Program Manager, replacing the old MS DOS based File and Program Managers. 

1992  Windows 3.1 


The later released upgraded version of Windows 3.0, which had support for 32-bit Disk Access, Personalization options and had the Minesweeper game for the first time. 

1995  Windows 95 


Windows 95, the changed look, the new interface and the beginning of the form of Windows which we see now. Enhanced Graphics and better Communication Programs. 

1998  Windows 98 


Windows 98, one of the most successful versions of Windows till now, this version of Windows can still be seen in some PCs even today. With Extended Softwares, better Performance, this Version was the first milestone in the path of the development of Windows. 

2000  Windows ME 


Windows ME or Windows Millenium Edition, though not a very popular version of Windows, but still it had some better tools and performance than the previous ones in some cases. 

2001  Windows XP 


Windows XP, the Daddy of all versions of Windows, the most popular version of windows even today. Windows XP is still used today because of its unmatched performance, tools and interface. This has been the best version of Windows till the arrival of Windows 7. 

2006  Windows Vista 


Windows Vista, though it didn't go so well in the public, but still its a good version of Windows specially for the interface the Windows Aerobic Effect, making the Window Transparency work like magic.

2009  Windows 7 


Windows 7, the best version of Windows till date. With the new and advanced features such as the Superbar, this version of Windows created another milestone for Microsoft after Windows 98 and Windows XP. Windows 7 features an unbeatable user interface, and powerful tools that makes it the best among the rest. 

2012  Windows 8 


Windows 8, to be released in the late 2012. The interface of Windows 8 as seen at the D9 Conference. A better version of Windows as proposed by Microsoft, with the changed User Interface.

By: Muhammad Iqbal Akhtar.

Thursday, June 2, 2011

How to Use Word 2010 Remove Background Tool


By: Muhammad Iqbal Akhtar.
One of the lesser known new features that Microsoft added to Word in its 2010 release is something called the Remove Background Tool. In short, it’s a photo editing tool that replicates one of the features of high end applications such as Photoshop.
The Remove Background Tool does just what its name implies; it removes some or all of the background from images; something you might find comes in handy when placing photographs into Word documents.
First of all pull the image into Word by first clicking on the Insert option on the main Ribbon, then by clicking on the Picture icon, and then using the file manager to locate and retrieve your image. Below is a test example.

Next, if the Picture Tools menu is not showing, click once on your photograph to bring it up. It should look like this:


Notice on the far left side of the Picture Tools menu bar where it says Remove Background:


With the image still highlighted, click on the Remove Background icon, it should cause something like this:


Some of the background has changed color and a box was drawn, hopefully, around the main image in the picture.
At this point, you can accept what Word has automatically done for you by clicking on the Keep Changes icon,:

The result should look something like this:


If on the other hand, you find that the box that was drawn didn’t quite cover the area you were hoping for you can change its size by grabbing the handles on the sides and corners and dragging them to where you want them to be; then if you are happy with what you’ve got, click the Keep Changes icon.


Or if you’re still not happy with what Word has done to identify the part of the background you wish to have removed, you can use the Mark Areas to Keep orMark Ares to Remove icons.


The Mark Areas to Keep icon allows you to draw straight lines using your mouse that will undue some of the background removal that was done automatically by Word. To see how it works, click on the Mark Areas to Keep icon, then move your mouse over the image.
Then click and hold down the left mouse button while moving to another place over the image; a dashed line should appear showing you the line that is being drawn. Then, let go of the mouse button. You should see something like this:


In the example, the red color came from the original background that was removed automatically; it was restored by using the Mark Areas to Keep icon.
To see how the Mark Areas to Remove icon works, once again click on it, than move your mouse to a place over the image, then once again hold the mouse button down as you draw a dashed line from one point in the picture to another. When you let go of the mouse button, you should get something that looks like this:


The addition of more purple means more of the image was removed.
After clicking Keep Changes, it looks like this:

Clearly adding and removing parts of your image using these two icons is an inexact science to say the least. The best approach is to use trial and error as you gradually come to see how the two icons “think.”
Also, you can draw multiple lines; adding and removing till you think you have what you want; and along the way, you can use the Delete Mark icon to get rid of any of the lines you’ve drawn.

Just hit the Delete Mark icon and then double click on any line you don’t like and it will disappear.
Or get rid of all the lines at once by clicking on the Discard All Changes icon:

When you’re happy with your work, click the Keep Changes icon to save what you’ve done.


Finally, remember that the finished product is still an image, and therefore all of the other new photo editing features in Word 2010 can be used once you’ve removed the background, which means you might wind up with something that look like this:


Microsoft has clearly taken some giant steps with the addition of features such as the Remove Background tool, and now users who take advantage of them can make truly professional looking documents without having to resort to other applications for touching up photographs and other graphics.


Tuesday, May 24, 2011

10 Hot New Tech Gadgets


~~~~~~~~~~~


The Logitech Wireless Solar Keyboard K750 makes battery hassles a thing of the past, even indoors. The keyboard connects automatically via a 2.4GHz wireless unifying receiver, and the solar battery will stay charged for up to 3 months, even in total darkness.
Cost: $79.99
~~~~~~~~~~~~~~

Making the perfect external storage companion to the Apple® Macbook®, MacBook™ Pro or Macbook Air™, the new Hitachi G-DRIVE™ slim external hard drive gives users 320GB of storage and ubiquitous USB 2.0 connectivity in an amazingly slim form. Formatted for Macs with simple plug n’ play connectivity, the G-DRIVE slim is Time Machine® ready for added backup protection, and it’s USB-powered, so there is no need to carry around an extra power cord.
Cost: $99.99
~~~~~~~~~~~~

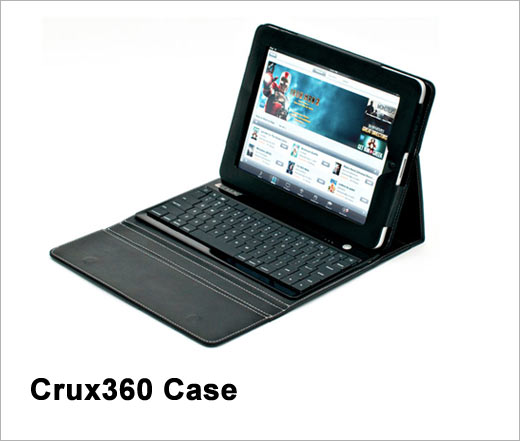
The Crux360 is a clamshell-keyboard case that allows you to use the iPad® in a multitude of positions. All iPad ports and buttons remain accessible while using the case.
It features a full bluetooth® keyboard, and features four modes:
  1. Laptop Mode — allows use of the keyboard.
  2. Movie Mode — great for watching videos, playing games, or just surfing the Internet.
  3. Tablet Mode — great for reading books or magazines.
  4. Carry Mode — closes up and protects your iPad’s® screen from nicks and scratches.
Cost: $149
~~~~~~~~~~~

The Livescribe Echo Smartpen allows you to record audio while you’re taking notes, and then play them back later. You can save and share interactive notes to your computer, iPad or iPhone via a micro-USB connector that also allows you to recharge your pen. The memory storage holds 400 or 800 hours of recorded audio, depending on the model, and includes an OLED display that makes it easy to navigate smartpen apps.
Cost: Starting at $169.95
~~~~~~~~~~~

The iLuv iMM747 Audio Cube is a fully-dedicated iPad stereo docking station. The Audio Cube provides two speaker channels, each with iLuv’s enhanced jAura Soundcell Technology. The iMM747 features easy docking via an adjustable, sliding docking wall, which provides secure iPad vertical support and a flexible 30 pin connector that automatically adjusts to dock your iPhone 4 or iPod as well.
Cost: $149.99
~~~~~~~~~~~~~

The LaCie Hub4 USB 3.0 gives you enormous flexibility to connect your peripherals, wherever you go. With four USB 3.0 ports, it's easy to get the fastest USB 3.0 speeds—up to 5Gb/s. It's even USB 2.0 compatible, so it works with almost all computers, laptops, and even netbooks.
Cost: $59.99
~~~~~~~~~~~~

The iFusion is an integrated communications docking station for the Apple iPhone. Combining the capabilities of many top-selling iPhone accessories into a single device, the iFusion utilizes built-in Bluetooth technology, a full duplex speaker phone and a patented ergonomic design to deliver superior voice quality that meets the requirements of today's home and business consumer.
The cradle design of the iFusion supports the iPhone 3G, 3GS and 4, providing a means to securely dock the phone while supplying power, battery charging and data synchronization via an integrated USB cable. With support for A2DP Bluetooth streaming, users are able to enjoy their favorite iPhone music over the internal speakerphone.
Cost: $169

~~~~~~~~~~~~~~~~

Maximize your brightness during presentations with the NEC P420X, an entry-grade professional installation projector loaded with eco-friendly and advanced technologies. Ideal for corporate boardrooms, higher education classrooms and government training rooms, this model delivers remarkable brightness (4200 lumens) and features built-in wall color correction, automatic keystone correction, wired and wireless networking, closed captioning and up to 3500 hours of lamp life (in ECO ModeTM). The P420X touts an active lens cover, which hides content, mutes audio and lowers lamp brightness to 25%, allowing you to maximize the effectiveness of your presentations.

Cost: $1,999.00

~~~~~~~~~~~~~~

myDitto Key enables SoHo business professionals to access their myDitto Servers remotely, through an easy-to-use, lightweight USB key. From owners who frequently travel on business trips to telecommuting employees, users simply insert their myDitto Key into a laptop or PC and — through a direct peer-to-peer connection — safely access any critical file from their office network server no matter where they are.
Cost: Starting at $145

~~~~~~~~~~~~~~~~

The WOWee ONE SLIM is a compact portable speaker unit which provides a full range frequency response. It is intended for use as both a fixed and portable solution for all iPod, iPad, mp3, mp4, mobile phone and computer applications. It uses the same hybrid technology as the WOWee ONE and produces an incredible bass sound with a 40Hz - 20kHz sound range.
The unit is powered by an internal rechargeable battery and can deliver up to 10 hours of playtime per charge. It can be recharged via computer USB or a 5V USB power adapter using a plug. There is also a built in LED low battery indicator.
Cost: Coming Soon


Sunday, May 22, 2011

How to Check if Windows 7 is Genuine?


So you have a computer with Windows 7 installed, but you’re not sure if you are running a genuine version of the OS. You may have this issue if you downloaded a copy of Windows 7 or if someone installed it for you.
Either way, there are a couple of different ways to check and make sure that your Windows 7 copy is genuine.

Method 1 – Activate Windows Dialog

The first way to validate that Windows 7 is genuine is to click on Start, then type inactivate windows in the search box.


If your copy of Windows 7 is activated and genuine, you will ge t a message that says “Activation was successful” and you will see the Microsoft Genuine software logo on the right hand side.


Method 2 – Validate Online

The second way to determine if you have a valid copy of Windows 7 is to use the validation tool on the Microsoft website.
If you ever tried to download updates from Microsoft, you’ve probably noticed that sometimes your copy of Windows has to be validated before it allows you to start the download.
Well, you can use that tool independently of downloading an update by going to the following address:
Then click on the Validate link at the top. Make sure that you visit the site while in Internet Explorer, otherwise it will ask you do download a small program onto your computer in order to validate.


Method 3 – Control Panel

The third way to check for genuine Windows 7 is to go to the Control Panel. Click onStart, then Control Panel, then click on System and Security, and finally click onSystem.


Then scroll all the way down to the bottom and you should see a section called Windows activation, which says “Windows is activated” and gives you the Product ID. It also includes the genuine Microsoft software logo.

So, in conclusion, if you have bought a copy of Windows 7 from a shady local computer dealer or off eBay for a reduced price, you may want to check and make sure the product key is actually valid and not counterfeit!
If you have any other questions about whether your copy of Windows 7 is valid, post a comment here and I will try to help. Enjoy!

BY: Muhammad Iqbal Akhtar
Source:http://helpdeskgeek.com/windows-7/check-if-windows-7-is-genuine/